Saturday, December 7, 2013

Lots of work

Snow is finally falling in Krakow, and that means motorcycle restoration

The Aprilia is mostly apart, and the engine is now in the shop where I've got it on a table to start work


First order of business is to get the cylinder head off. Not a lot of pictures because it's basically just take off the bolts and hit it a bunch of times with a hammer.


Wow. The head gasket is De-stroy-ed! This could be my compression leak.

Next take off the cylinder. Loosen bolts and hit with hammer. Hit more with hammer. Hit harder with hammer. Ok, and it's loose.


And cylinder base gasket is destroyed too. Well, that's enough for today. Time to take apart the Vespa.


I've got some stuff off already, tossed in a box.


First comes the muffler


It's just two bolts and a bunch of hitting stuff with a hammer.

Carburetor.


Take off the seat.


Get the wiring things off, all the cables, etc.


Take off the gas tank.


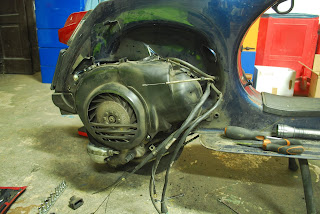
Engine comes out.


That's it for today, minus the steering column


Thursday, November 21, 2013

Swingarm is off, very close to engine removal

Almost there


Finally got a look at the engine serial number on the transmission case from underneath where the rear shock would normally sit. This will be needed for correctly selecting parts


Interesting to see that the cylinder was made by Gilardoni


Sunday, November 17, 2013

Soon to be seriously naked bike

Drained the oil, removed the exhaust headers, took off a ton of wires and hoses off, got the airbox off, getting closer to removing the engine


Thursday, October 24, 2013

Beginning

The Aprilia Pegaso is mostly together


but soon to be mostly apart.

Took some stuff off, and drained the coolant.


Monday, October 21, 2013

The other Piaggio product needs some attention

Er.

I've also got a 1998 Aprilia Pegaso 650. I took it on a long trip to Lithuania in spring, and well, it hasn't been the same since. I started getting a little misfiring and loss of power on the way back, but when I got close to home, it was so bad I was afraid I wasn't going to make it.

I've had tons of various theories about what happened from carburation to electrical, but after troubleshooting everything, it comes down to compression.

So I got myself a compression tester. Ugh, this thing is so dirty and covered in oil.


Ok, well that is somewhat better


It's a 650cc single, so to do the compression test, I warmed up the engine and took the valve cover off so I could tape shut the decompressor on the end of the exhaust camshaft. Here we can see the compression tester screwed into the spark plug hole.


And here is the reading. Yeah. It's either dead or dying. 7 bar is too low.


For a while, Aprilia was making a bike for BMW, the F 650, with essentially the same Rotax engine. There is a great forum for the BMWs. Got some information about compression testing this engine and interpreting the results here.

Key is:

- A new engine should have something between 10-12 bars. After a while this reduces to 8-10 bars. Service is needed when it drops below 7, but you'll recognize that because the engine won't run correctly (no power).

Oil Consumption check

I thought I would do an oil consumption check as well. The engine should burn 2% 2T engine oil. That would mean that if I get 3L/100km, I should get (3*0.02) = 0.06L/100km of oil consumption. Or a whopping (1/0.06*100) 1666km per 1 liter bottle of oil. We'll see. I figure the most scientific way to do this is to run the thing nearly out of oil, so I can fill up a whole bottle, and see how many km I do when I run out of oil again.

So this is what the visual gauge looks like when a Vespa PX is low on 2T engine oil


My test begins at 31620.7 km

And by the way, previously I had used 2-Stroke Oil SIP Formula Race. At 7.20 EUR per liter, I thought this was pretty expensive. So I thought I would try Orlen Mixol S at 3.60 EUR.

NEVER AGAIN!

OMG, what a disaster cheap 2T oil is compared to the SIP stuff. The SIP was literally smokeless and odorless. Now when I go on the gas with a cold engine, I have a gigantic cloud of blue smoke behind me. It's crazy ridiculous terrible bad. When I start the thing up in the morning in the garage, a thick haze fills the air with a sickly smell. The difference in the color and odor of the smoke is easily worth the price of the SIP oil.

Thursday, August 22, 2013

Fuel consumption check

Haven't posted in a while. I'm still alive, just ran out of cash and enjoying the summer weather. Anyways, the issues with Fiametta are cosmetic, so makes more sense to just keep riding while the weather is nice.

Just another fuel consumption check at the moment. Just did 186.7km on 5.54L of fuel = 2.967L/100km = 79.28 US miles/gal.

One thing that I've been thinking about lately, is how many km does this Vespa go on 1L of 2T oil? I'm waiting and waiting and waiting for the thing to get low on oil. If I recall correctly, it should burn only 2% oil, so target would be 1L oil per 50L of fuel. 50L/3*100=1666.67km per L of oil. I filled up the oil when I first got the scooter, then topped if off later finishing the bottle. So it makes sense that it's low, but man I'm nervous about running the thing without oil. Of course is a little window gauge that shows there is still oil. When I pull off the cap and look into the tank I can still see oil. Should start getting low soon...

Friday, July 26, 2013

Vespa PX 125 front disc brake master cylinder rebuild

Fiametta has a problem. She just can't stop herself.

She's been this way since I met her. The rear drum brake works fine, but the front disc brake works intermittently. Front braking goes like this: a little bit of braking, slip, a lot of braking. Really jerky stop/start sort of reaction. So it seems pretty simply, just replace the brake fluid. Except when I saw this seal:


And I figured, that is a pretty good explanation for why the brakes have water/air in them and/or fluid leaked out.

Thankfully a master cylinder seal set costs about 40 zloty or about $11.


First I'll take the front wheel off


This is mainly for convenience to get at the brake caliper


I've loosened the bleeder screw in the above pic, once I take the master cylinder cap off, the fluid really comes out.


Here are the ruined seals of the master cylinder:


The new seal set


How the master cylinder gets assembled


Whew, took a little vaseline to get that all together


Assembled including the new gauge o-ring and cap seal


Put some bearing grease on the brake lever


Reassemble and we're good to go!


To answer Joe's question from the comments section, this o ring:


Seals the inspection window which shows you how much brake fluid you have


This translucent (it isn't perfectly clear) plastic part gets inserted from the inside into a hole in the front of the fluid chamber and secured with a spring clip.


The cap seal


goes on top of the fluid reservoir under the metal cover